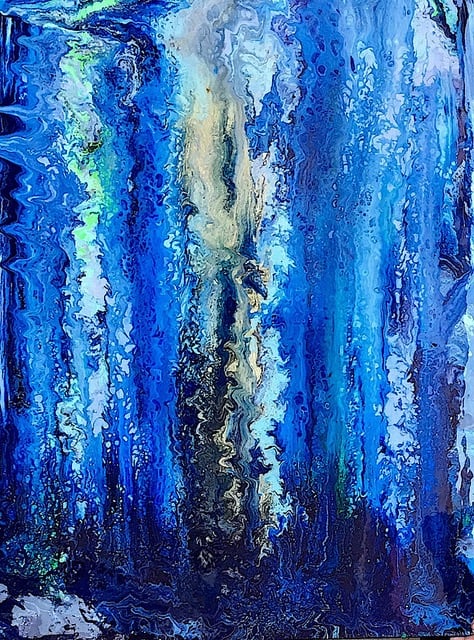
In case you did not see my video or read my blog entry last week, my apologies to those of you who like to use these videos as a recipe to create your own paintings. In this blog entry I’m not able to give you precise measurements or even the actual names of most of the colors I used. Most of the paints used in this video were purchased off the “Mistakes Table” at my local Lowes. Paint stores typically have a section for mixed paint that the customer didn’t like. Some people may not consider these paints to be ‘Artist Quality’ but they work great for me and the price is very appealing.
Supplies I Used:
- Lowes Paint Dept. Colors – Lavender, Turquoise, Black, and White
- Bulk-Krylic Paints from Michaels – Pthalo Blue, Neon Green, Neon Yellow, and Metallic Gold.
- Spot On Treadmill Oil
- 30×40 canvas
- Swiping Tool
*Metallic Gold paint was used straight from the bottle with no additives.
Approx. 16 oz of all other colors were made by mixing paint with water and Zinsser Paint Booster. Four drops of silicone were added to each 16 oz. cup of paint.
Last week I posted a video called “The Steve Shaw Stripe and Swipe.” The painting I created in that video was a practice run for a much larger painting which you will see me create in today’s video.
If you ever get the urge to ‘Go Big or Go Home’ there are a few things you should do in preparation.
Work Area
If your studio/kitchen table is small, you will need a larger area to work in. The 30×40 inch canvas I wanted to paint on, was larger than I could handle in small studio so I took the project out to my front yard.
Larger Amounts of Paint
A larger canvas is going to require a lot of paint. Through trial and error I figured out that I typically need 16 ounces of paint to cover a 16×20 inch canvas and I used that to come up with a formula. Please don’t ask me to explain the math, but this equation works for me: multiply the length times the width of your canvas to get your total area. Then multiply that number by .05 and that will tell you how many ounces of paint you will need. For example, the canvas in this video is 30 inches by 40 inches so… 30 x 40 = 1200. Now multiply 1200 times .05 and you get 60. I know I’ll need 60 ounces of paint to cover this canvas. You may mix your paint thicker or thinner than I do, so you may need to adjust the .05 number but this equation is a good starting point.
A Safe Drying Place
Make sure you have a safe place for your painting to dry. I like to work in my front yard mainly because I love the fresh air and the high ceiling. But when your painting is done you will probably want to move it to the garage or some covered area for it to dry. Leaving your beautiful painting outdoors for several hours or overnight is just asking for trouble. Showers could pop up, a curious cat could stop by or even something as simple as a falling leaf could really mess up your new masterpiece.
A Practice Painting
A key part of your preparation should be a practice painting. You may think you know how your paints will react to each other but you never really know. That is why you should do a practice painting before pouring a large canvas. I like mixing up all my paints beforehand. Yes, you will need to calculate the amount of paint needed for the practice painting and add that to the amount of paint needed for the large canvas. I highly recommend mixing up all your paint at one time for consistency’s sake. Once you have made the practice painting and have learned what is working for you, then you can shift your focus to the larger painting.
Working on a large canvas can be intimidating not just because of the sheer size, but also because you keep thinking about how much money you spent on the canvas and how much paint you are using. This is one more reason to do a practice pour. Familiarity with the paint will make your comfort zone much larger.

The Main Event Pour
Last week I made my practice pour and I learned a few things. For example my gold paint was too thick and needed to be thinned. Also, I wasn’t totally happy with the overall look of the practice pour and I ended doing a swipe over it. In the end the swipe saved the day and I ended up with a pretty painting.
When I moved to the front yard and did my larger pour, I honestly didn’t think I would need the swipe. The painting had lots of interesting elements and at one point in the video I thought I was done. I said my goodbyes to the camera and shut off the video. A few minutes later I started looking at the canvas and realized that I wasn’t totally happy with it. It was interesting and had lots of pretty elements but it lacked a feeling of cohesion or unity. Before I really even realized what I was doing, I turned the camera back on and added a dark blue swipe—just like I had done in the practice painting. For a moment I wondered if I had done the right thing and I’m sure many viewers thought I had gone too far. But the painting quickly took on a new life, one that was much more unified and pleasing to the eye. Success!
When the paint had dried on both canvases I was pleasantly surprised by how similar the two paintings looked. I guess it makes sense seeing how I used the same techniques and the same cups of mixed paints—but I was still surprised.
Below is a side-by-side photo so you can decide for yourself. My biggest take away from this project was the confirmation of just how important a practice pour is when you want to make something really large. Even if you just want to bump up from an 8×10 to a 16×20, try a practice pour first. It will ease your mind and be fun to compare your two creations.

Steve Shaw is an artist and teacher living in Atlanta, Georgia. His days are spent in the classroom teaching his students the basics of art and self-expression. In the evenings and weekends, he paints. Steve has shown his work in several galleries in the Southeast and has illustrated three children’s books. Recently Steve has discovered acrylic pour painting and is putting all his other projects on hold while he journeys down this artistic road.
To see more, follow him on Instagram, visit his website, watch his videos on his YouTube Channel and purchase his paintings at Etsy.com.
