Facebook Shops: New Tool to Sell Art on Facebook
Nowadays, everyone has a Facebook account. Wouldn’t it be great if you could use Facebook to sell your artworks conveniently all from inside Facebook?
Welcome to Facebook Shops! This new feature allows you to set up an E-Commerce shop from right inside Facebook. From there you can invite our friends and give buyers a cart-like shopping experience. In this article, I’m going to explain exactly how to set up your Facebook Shop so that you can begin selling your Art today! It’s easy!
Whether you are planning to open your first website or already have one, Facebook Shop is a must-have platform to sell your art to a larger audience. Let’s face it, everyone is already on Facebook anyway!
Facebook Shop is quite accessible and convenient as we can invite our Facebook friends or open it up to the public and attract more buyers. Moreover, Facebook’s user interface is well known and it’s easy to post a new product and gain everyone’s attention in real-time. Everyone knows how to use Facebook which makes Facebook Shop quite user-friendly.
Use Facebook Shop to Supplement Your Website
Even if you have your own website, you still need to promote its link on social media platforms to direct potential clients to your link. Facebook Shop, which is linked with your Facebook page, does this job easily for you. If you wish, you can still promote the Facebook shop link. Facebook Shop also comes with its brand name, which makes it more attractive to the audience.
To see what a Facebook Shop looks like, check the link in my bio below.
Selling on Facebook Shops is cheaper than Etsy
Let’s first understand the economics of Facebook Shop and compare it with other options.
In Facebook Shop, the cost for an artist is just 5% of the artwork’s price per shipment. That fee only applies if the piece is sold and when the price per item is above $8. If the price is below $8, there is a standard charge of $0.40 only. Moreover, you can list as many items as you want.
Now, compare this with any other popular platform.
- Etsy charges a listing fee. (Learn how much it costs to sell on Etsy)
- Fine Art America limits the number of items you can list for free
- Many online art studios, like Artfinder and Saatchi Arts, have additional charges or more than 20% commissions
- Selling on Shopify, or another website service provider requires monthly website subscription fees
In contrast, the total cost of selling your artwork on Facebook Shop is 5% transaction fees + Shipping cost + Tax, that’s it!
For example:
- My painting is priced at $100 and has a shipping cost at $20. Once I receive an order, the customer will have to pay $100 +$20 + taxes.
- I will receive payment of $95, by reducing 5% transaction fees.
- Facebook keeps the shipping fee and sends me a pre-paid label.
I feel Facebook Shop is more economic for beginners and intermediate users. Facebook Shop cuts out all of these fees and additional charges and just lets you focus on the art.
Interested yet? Now I am going to share with you 9 easy steps to open-up your first Facebook Shop along with the do’s and don’ts, from my own experience. You’ll be selling you art on Facebook Shops in no-time!
How to Set Up a Facebook Shop in 9 Easy Steps
Step 1: Set up a Business page, Audience, and your catalog
To open your Facebook Shop, the basic requirement is to have a Facebook business page.
Here is how to set up your business page:
- Create your own page and mark it as a business page
- Start attracting an audience to your page. To do so, just invite your existing Facebook friends to like the page. All the Facebook business pages are public, so as your feed grows your audience is sure to grow as well.
- Once your Facebook business page is set up, go to the menu on the left side and choose Shop in order to enable Facebook shop.
- If you are unable to enable it directly from the left menu, go to settings and enable the shop option

You can go one step ahead and connect your Instagram page to Facebook Shop which helps drive traffic from Instagram to Facebook really easily.
Step 2: Manage shop with Commerce Manager
Enable Shop option on FB page and explore it. FB shop is designed for Individual business owners or small/medium business owners.
Once FB shop is created, Go to Manage shop, Commerce Manager and then go to the last tab- ‘Settings’

Commerce Manager is a platform used to set up a shop and manage sales on Facebook and Instagram.
With Commerce Manager, you can choose where you want customers to complete their purchase.
There are three options:
- On your website
- On Facebook or Instagram with checkout
- With a direct message
Depending on your choice, you can access different tools and settings in Commerce Manager. All sellers can:
- Create and manage a Facebook Shop and collections
- See a summary of sales activities, catalog, issues to fix, and suggested actions
- View and manage items in a catalog
- Get insights about customers and popular items
- Explore ways to advertise your items
- Control commerce account settings, business information, and page permissions
Additionally, businesses with checkout can use Commerce Manager to:
- Let people buy items directly on Facebook or Instagram
- Offer Purchase Protection to customers
- View payouts, manage finances, fulfill orders, and process returns.
- Use an inbox to respond to messages.
- See an overview of your delivery and customer service performance.
- Contact support to get help with Commerce Manager.
Step 3: Go to settings and provide all the necessary details:
Here I am going to go through the different tabs in the settings area and explain the info you need to provide
General (Mandatory)
- Commerce account info: In this section, we need to share account name, email, business category, and currency to use
- Business address
- Default language and country
- Customer service: share an email that you check regularly so your customers can reach you and get the help they need
Catalog
- Nothing needs to be done in this section as of now. There is a separate section in this article which will help with all the details. Here’s an example of a completed catalog:

Business assets: Nothing needs to be done in this section as of now
Finance (Mandatory)
- Bank info: Here, you’ll need to share the name on the bank account, bank routing number, bank account number
- Tax info, or SSN number, Default Tax Category
- State tax registration (optional)
Locations
- Share Order Fulfillment Locations, which can be a home address or an office address in order to process received orders.
- Facebook has tie up with USPS, so if you are planning to use USPS, you need to share Order Fulfillment Locations.
Shipping (Mandatory)
- Here we need to mention standard shipping fees and expedited shipping fees. There is a separate section in this article which will help with all the details.

Returns
- Facebook has a mandatory return window of minimum 30 days in order to give good customer service. However, for certain categories such as handmade goods (arts etc.) the return window can be customized even to zero days.

Step 4: Catalog management
This is the most important and time consuming step. I am sharing priority tips and tricks to streamline the lengthy process.
Prepare your catalog as per Facebook’s requirements. Details on image size are required, description, and other key attributes, option to upload variants at various price points, etc.
Catalog management is basically adding your product inventory into the Facebook Shop. For beginners, you need to prepare your product catalog which you would like to post on your shop. Product catalog contains all info about an art piece like name, description, availability, price etc.
Once you go to the Commerce Manager page of your Facebook shop, you will get this window:
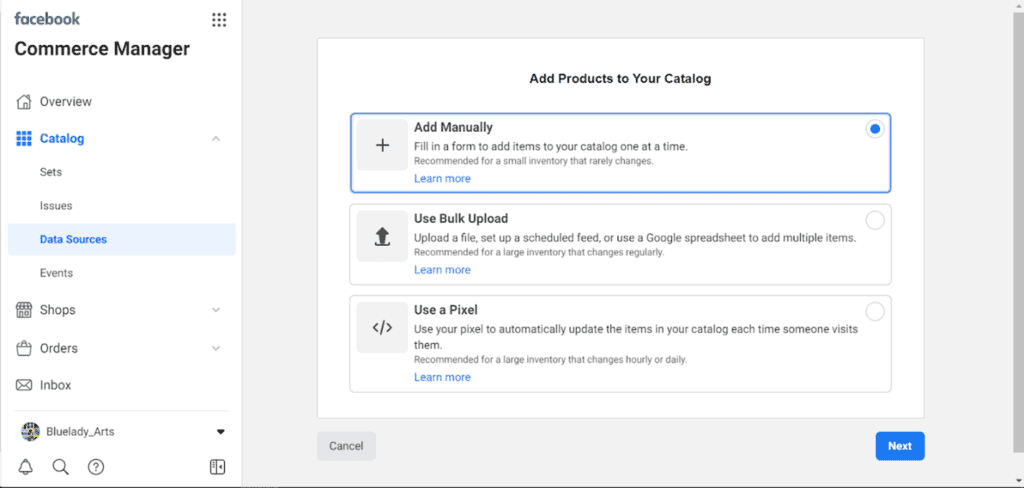
There are three options:
- Add manually- This is the easiest option, typically used when there are a limited number of items, to be mass uploaded at the beginning. I have around 60 artworks uploaded manually.
- Bulk Upload- To use this option, first create a data feed file that contains information about your inventory in CSV, TSV or XML format and includes the required fields for your inventory type.
If you want to set up scheduled feed uploads, you’ll need to save your file on a file hosting website first and have your URL ready.
- Create a Facebook Pixel – You need a Facebook pixel in order to run dynamic ads.
As per my experience, I tried using bulk upload in CSV format but there were multiple errors which were taking considerable time to resolve. The second time around, I chose ‘Add manually’ the option and uploaded all my paintings along with variants in 50 minutes.
Step 5: Edit and Check for Errors
After every upload, Facebook gives an approval for error-free addition. Frequently observed errors and corrections:
- Recommended image size is above 1200 pixels for both length and width
- Mandatory fields are as below, if any of these fields are not mentioned, error will occur
- Title
- Description
- Stock availability
- Price
- Availability
- Condition (New, refurbished, used etc.)

Variants: There is an option to add Variants of your artwork too in terms of size, material, color etc. Personally, I really liked this option to showcase the range of my artworks.

Step 6:Commerce Managementand Shipping Options
I really liked shipping options offered by Facebook Shop. Either you can opt for their preferred partner USPS or can choose our own shipping partner
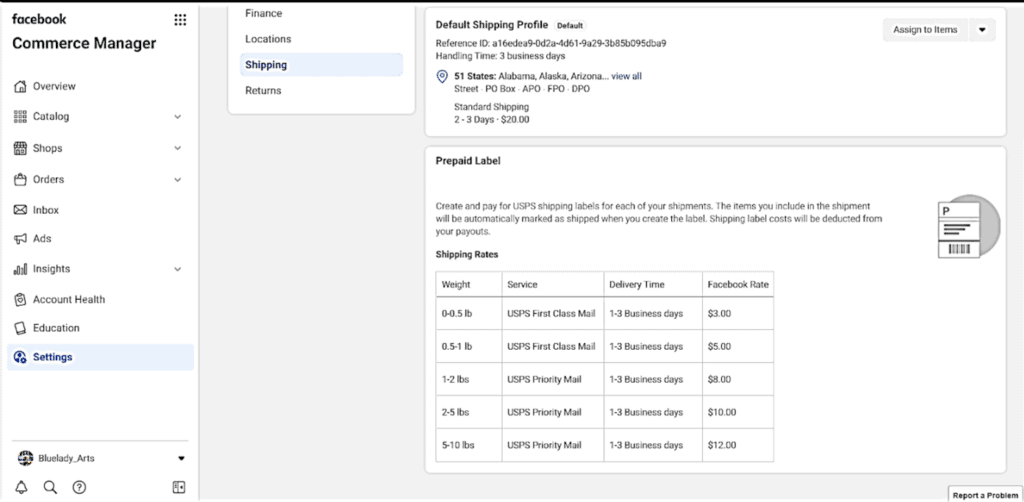
Option 1: Use USPS for shipping and enjoy special rates offered to Facebook Shop. For this option, first, you need to enter our fulfilment locations. Once you receive an order, you need to ‘Mark orders as shipped’ and share tracking info, which will be received by the customer. If we opt for this option, Facebook will email you the shipping label.
Below are standard shipping rates offered by USPS:
Option 2: Use your own shipping option. Ship the product via courier partner of your own choice and share the tracking number which will be received by the customer.
I found both of the options work well, it all comes down to your preference.
Step 7: Order Management
- With checkout, customers can purchase items directly on Facebook or Instagram. Checkout is currently available in the US.
- Once an order is placed by the customer, they have the choice to cancel the order in 30 minutes. After the 30 minute window, you will receive an order in your inbox. Once you receive an order, you will get notified in Facebook Shop and via email, so that you can prepare orders for shipment.
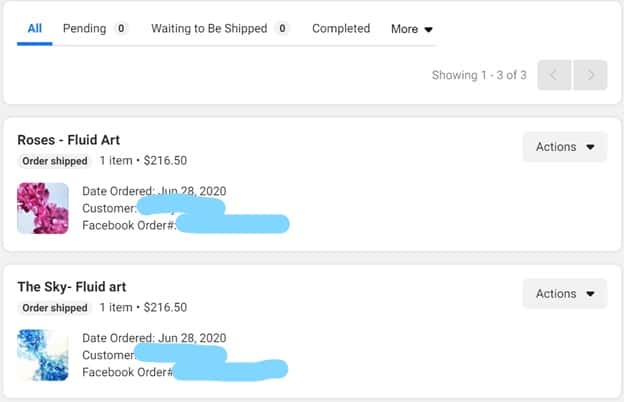
- To manage your orders, you need to go to Commerce Manager and go to Orders. You can manually mark orders as shipped or create and purchase shipping labels (to automatically mark orders as shipped). Be sure to provide tracking information to initiate your payout and them mark done.
- Then, you can review payout details for each order in Commerce Manager.
Below is a picture of an order fulfilment page by Bluelady_Arts FB shop.
Step 8: Getting paid for your art sales on Facebook Shops
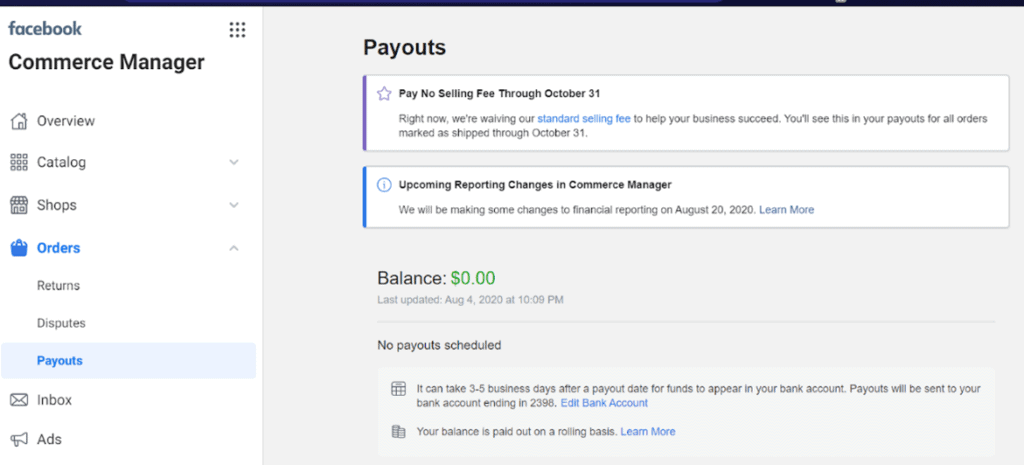
Payment processors handle our transactions. You can check Commerce Manager to see the balance and payout history. Payouts:
- Arrive within 8 to 10 business days of marking orders as shipped
- Include Reference IDs, payout dates and each amount in Commerce Manager
- Are issued in US dollars to the bank account provided in Commerce Manager
Payouts include a selling fee (5% per shipment for above $8 price)
Step 9: Post Purchase Management
The final step takes place after the sale. Now we will go over returns, disputes settling, and use of insights.
Facebook Shop has in-built insights which gives data visibility on – Sales, Units Sold, Orders, Average Order value, Checkout initiated, number of Adds to Cart, Adds to Wishlist and Content Views
In the world of data analytics, these insights come at no price with Facebook Shop. They have proved to be the best tool for me to identify customer demand and focus my efforts in that direction.
Tips for Selling Your Art on Facebook Shops
- Use insights to focus on your art production and marketing, you can also set up promotions to drive your sales.
- I highly recommend placing an order by yourself first and completing one order cycle to avoid any issues when real orders come.
- Update inventory as soon as the sale takes place to give good customer service.
- Make sure your customers can reach you.
- Ship orders within three business days and add tracking info.
- Reply to your customers within two business days.
- Follow your return policy and issue refunds within two business days.
- If you are beginner, explore and start Facebook Shop, initially with one to two artworks and develop over the time.
Overall, I think FB shop is quite convenient, well-known and well-trusted option to set up your eCom shop. It comes without any monthly charges and with wide reach to potential customers.
Personally, my sales have gone up since I moved to Facebook Shop. I went one step ahead and connected my Instagram page to Facebook Shop which helps driving traffic from Instagram to Facebook.
Please let me know in the comment section, if you would like to know how to connect Instagram to Facebook Shop and drive sales even further.
Cheers, and Happy Painting! ☺
More Posts About Selling Art Online
- How to Make Prints of Your Artwork: Create, Print, Profit
- How to Get Your Art Noticed Online: Boosting Your Presence
- How to Choose Your Social Media Selling Platform
- Intellectual Property: What is it and Can I Use it in my Art?
The Business of Art Posts

Hi, I’m Snehal, an abstract artist specializing in fluid art and alcohol ink art techniques. I am currently based out of the USA, and originally from India. I enjoy an act of bringing balance between the high flexibility and control, which comes with the abstraction of fluid art and alcohol ink art techniques. I like to use pastel, delicate, and sometimes bright colors to bring harmony and positive emotions. My philosophy is to create paintings with passion and love in order to bring peace. Life is really beautiful; we should just meditate it with the lens of colors!

Thanks for the detailed information. I’d appreciate if you’d expand on how to connect Instagram to Facebook Shop.
Hi Marissa
Thanks. I am working on a new article to connect Facebook shop to Instagram. Stay tuned!
-Snehal
Hi I to really appreciate the detailed information and have the same question as the previous post. how exactly do you connect a Instagram account to Facebook. also, when I go into settings (step 2) I don’t have as many available options as what was shown in your instructions. For instance shopping, shipping and finance do not appear on the tabs.
Hi Lyn
Thanks for compliments.
To get the all options as mentioned in step 2, I hope you have clicked Commerce Management page at the left upper side and then clicked on ‘Settings’ tab at the bottom.
Thanks,
Snehal
Hi Snehal
Amazing article..waiting for above mentioned How to connect on Instagram shop article.