This Acrylic Painting for Beginners Tutorial is great for novices who may have never picked up a brush before and for intermediate level artists who want to try out acrylics for the first time.
Do you want to create your original acrylic artwork but you are not sure where to start?
Acrylic paint is probably the easiest medium to tackle for beginner painters and the fact that you can paint over and change things several times without creating mud, makes it much lower stress that other media, like alcohol inks or printmaking.
Also acrylic painting with a brush is very controllable and allows painters to create more realistic pieces than they may otherwise with acrylic pouring or resin art. By learning basic acrylic painting techniques you can also expand your pouring work with embellishments to give it a little more structure and composition.
In This Article
We’ll start by describing the tools you need to be successful, including what paint, supplies, and supports to buy. There will be a lot of precious tips and questions answered and plenty of resources on where to find more information.
Then we’ll dig into a step-by-step painting exercise to get comfortable using the paint.
By following along with the tutorial, you will learn how to get started painting in acrylics and you will be able to complete a painting while learning many skills that will serve you well in your future painting adventures.
This tutorial covers many of the key info you need to know about painting with acrylics including:
- The unique characteristics of acrylic paint
- The 7 must-have painting supplies
- Some optional supplies that are good to have handy
- Which acrylic paints to buy
- Colors you need to create a limited color palette that is great for any painting
Plus, the article is full of info about how to paint including:
- A step-by-step painting that you can follow along
- What kind of brushes to get
- The correct use of values in painting
- How to further develop your acrylic painting skills
- And more
All right, let’s get started!
The Unique Characteristics of Acrylic Paint
Acrylics are an awesome painting medium for beginners and professionals alike because they are water-based, do not smell, come in all kinds of colors and thicknesses, and they dry very quickly allowing easy correction of “mistakes.”
Heavy body acrylics handle similar to oils but being water-based they are easier to work with and to clean up. Unlike watercolors, undiluted acrylics are pretty opaque and make easy to paint in layers and cover mistakes.
Acrylic paint is made of pigments in a polymer emulsion, simply put it’s a colorful plastic. All paints, gels, mediums, and varnishes are basically the same polymer plastic substance, but with different weights, viscosity and thicknesses. This is why they are all compatible.
Things to consider when buying acrylic paint – all info is on the tubes. The different types can be mixed and combined.
Consistency
- Heavy Body
- Soft Body
- Fluid
- Ultra Fluid
Format
- Tube/bottle
- Bottle w/pipette dropper
- Marker
- Spray Can
Color
- Pigment type
- Lightfastness
- Strength
Coverage/Opacity
- Opaque
- Hue
- Semi-opaque
- Transparent
What Do I Need to Start with Acrylic Painting?
Let’s jump into the juicy part of what art supplies and materials you need to start painting with acrylics.
We’ll cover the seven things you need to have, and then a few more things that are nice to have but not necessary, including tips on what kind of paint, brushes, canvas, and easel to buy.
Let’s start with the seven things that you need to have to be able to paint with acrylics.
The 7 Must-Have Acrylic Painting Supplies
Acrylic Paint
You guessed it, you are going to need some paint.
It might be tricky to choose from the many brands, various thicknesses, several qualities, tons of colors available on the market – see number two for more details about which colors to buy. Feel free to acrylics of different kinds, they are all inter-mixable.
My go-to brands are Liquitex, Golden, and Utrecht. My overall favorite paint is Golden heavy body.
One thing to keep in mind when choosing which one to buy is that acrylic paints come in student quality or artist quality. Artist quality paint is usually more expensive than student quality because it contains more pigments and less filler, so you need less paint to attain nice coverage and bright colors. In general, be aware that the more it costs, the higher the quality of the paint, and the easier it might be for you to get the results you want.
What Colors Should I Buy?
To start, only buy a small number of tubes. You can mix pretty much any color you need from just a few colors.
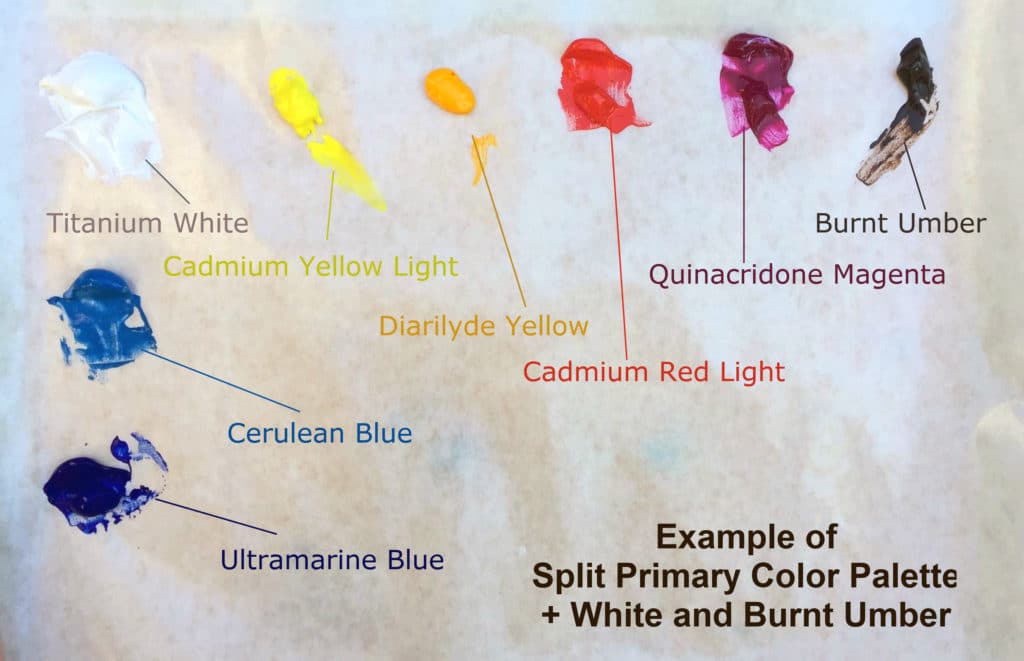
I recommend a starting palette that includes 7 colors plus white, this is known as a limited split primary color palette and it’s great for any painting.
My version of the split primary color palette includes a warm and cool version of each primary (two blues, two yellows, two reds) plus burnt umber to create your darkest colors and white to lighten up.
The colors you use can vary, as long as they follow the slit primary rules stated above. Here is a great example of colors to include in a limited split primary color palette: ultramarine blue, cerulean blue, cadmium yellow light, cadmium yellow deep, cadmium red light, quinacridone magenta, burnt umber, and titanium white.
Which Brushes Do I Need?
The best sizes and shapes for your brushes depend on your painting style; however, you can start with three or four sizes of flat brushes which can be used to obtain different kinds of brushstrokes.
To start, I recommend a few synthetic sable flats, approximately 1”, ½”, and ¼”, and a small round brush for details.
My starting brush set was by Royal and Langnickel, and I’ve been very happy with it. They are of good quality and not too expensive.
Tip: Use big brushes at the beginning, keep the small brushes for final details.
On What Surfaces Can I Paint?
Acrylics work on a wide range of surfaces, as long as they are not oily and the paint sticks after dry – test if not sure.
The typical art supports are stretched canvas, canvas boards, wood panels, and paper. But the possibilities don’t stop there. I’ve seen people paint with acrylics on stones, vinyl tiles, walls, furniture, fabric, and more.
When buying pre-made canvas, check that it’s primed for acrylic painting. Oil primed canvases are not suitable. In the long run, acrylic will peel off from anything oily.
Tip: While you can never paint with acrylics over oil, you can use acrylic paint for an under-painting and then paint with oils on top.
Where Should I Mix the Colors?
You’ll need a palette on which to mix your paint, it can be made of wood, plastic or paper. Non-porous surfaces are highly preferable, like a sleek paper plate or a piece of plexiglass that you have around the house. Squeeze out a good amount of paint and use it generously. Tiny amounts of paint will make your painting look stingy.
To keep my acrylic from drying in between painting sessions, I started using a Sta-Wet Palette which keeps acrylic paint wet for days. This has hugely improved the amount of paint I feel comfortable squeezing out.
How Much Water Do I Need?
Acrylic paint is water-soluble, so it’s important to have water handy at all times for adding to the paint while mixing – just a little bit – and to rinse the brushes.
I like to use a plastic container with a wide opening that holds one liter of water or more.
To keep your water from getting muddy quickly, wipe the extra paint off your brush on a paper towel before rinsing it. The paint will dry to plastic on the paper reducing environmental and waterways contamination.
Another thing to keep handy is a water spray bottle, to prevent fast drying of the paint blobs on the palette.
Paper Towels or Rags
Paper towels or rags are necessary for things like absorbing the extra water from the brush, wiping the extra paint off your bristles, and wiping off mistakes while still wet.
Optional Acrylic Supplies
Do I Need an Easel?
You should always try to set up your canvas or support propped up so that it’s facing you. This helps better seeing the perspective and the proportions of your composition. A tabletop easel is a great option. If you like to stand up while you paint, as I do, a floor-standing easel is best.
No easel? No problem. A solution is to lay the painting flat on a table and paint standing up, looking down perpendicularly on it. Or you can use books and something else to prop your painting up.
However, table-top easels are not expensive and make your life much easier.
Do I Need Acrylic Medium?
There is a huge range of different acrylic mediums out there, they are designed to improve the paint performance or to create some kind of special effect.
I recommend that you get familiar with the acrylic paint before you buy any mediums because it depends on what you feel you’d like to improve.
Some of the mediums are for increasing the drying time, for making the paint glossy, making it thick, create texture, or improve the flow. You can improve the flow simply by adding water to the paint.
Another way to use an acrylic medium is to add to high-quality paint to extend the amount. Medium is less expensive than paint, and high-pigment paint can be mixed with a lot of medium without losing its qualities.
Apron
How should I dress for painting? Wear comfortable clothes that you are not afraid of staining or an apron. Acrylic paint is pretty hard to wash off.
Neutral colors are the best. Strong colors could create a colorful reflection on the canvas and your palette, interfering with how you see the colors of the paint, especially if you are painting in strong light.
Hairdryer
Acrylics dry pretty quickly, but sometimes even that is not fast enough. For when you are eager to move on to the next step and want to speed up drying time, a hairdryer can be very useful.
Commonly Asked Questions
How Do I Take Care of My Brushes?
To keep your brushes in good shape, don’t let the paint dry on the bristles.
After each painting session, make sure you clean them thoroughly with soapy water. Rub them on the palm of your hand, rinse well, then lay them flat to dry.
How do I set Up My Workspace?
Choose a location with plenty of light and where you can keep your materials within easy reach.
You are going to need a flat surface for your palette and water, support for your canvas, and a place to rest your brushes between uses.
I paint at a standing easel and I have a cart on my side holding my brushes, palette, water, and rags.
What Are Some Acrylic Painting Techniques?
Acrylics are suitable to a wide array of techniques and textural results; with their versatility, fast drying times, and bright colors it’s no surprise that they are extremely popular.
Many creative tools can be used to paint with acrylics. Don’t limit yourself to using brushes.
Almost anything can be used as an alternative way to apply paint, from the most obvious painting knife or fingers to old credit cards, rags, silicon shapers, sponges, q-tips, old combs, etc.
Using different applicators will keep the painting looser and less predictable, also several creative applications have the perk of creating very interesting textures and edges.
You can read more about creative acrylic techniques here.
Acrylic mediums are particularly suitable to embed collages and creative materials, and can also be used to mimic a bee’s wax encaustics look.
What should I paint as a beginner?
Start from a subject that excites you but is not too complicated.
Feel free to paint the image in the tutorial below or find another royalty-free reference photo (I found mine on Pixabay creative commons).
It’s ok to practice by copying your favorite artist’s paintings, especially if you are not planning to sell them.
Should I varnish my paintings?
I recommend always varnishing your paintings. It helps seal the surface, prevents dust and particles to attach to the paint and it unifies the sheen. I use Golden Polymer Varnish, in Matte, Satin or Gloss, depending on the look I’m after for each piece. Here is an article with more information about varnishing why and how to varnish.
What kind of acrylic paint would be considered “low-quality”?
The main advantage of high-quality paint is that the pigmentation is much higher. Lower quality paints have less pigment and can make color mixing and coverage much harder.
To find out the quality of the paint, look at the label on the container. If it says “craft acrylic paint” it’s low quality. The high-quality paint usually says “artist” somewhere on the label. If it says great for students and beginners it’s usually lower quality.
How do you blend with acrylics, do you need to use a medium?
Blending is tricky with acrylics due to their fast-drying time. You have to act on the blending right away, can’t wait to come back to that area later, or it would be dry already.
As an alternative, you can use a drying retardant medium or a type of paint that dries slower, like the Golden Open, and that makes blending easier.
What do you use as glue for collages?
To glue collage materials, I use a Golden soft gel medium with an easy three-step process:
- Spread a nice amount of medium on the surface, using a palette knife
- Apply the paper or (light) object that you want to attach
- Cover with another layer of medium to seal it.
Acrylic Painting Tutorial
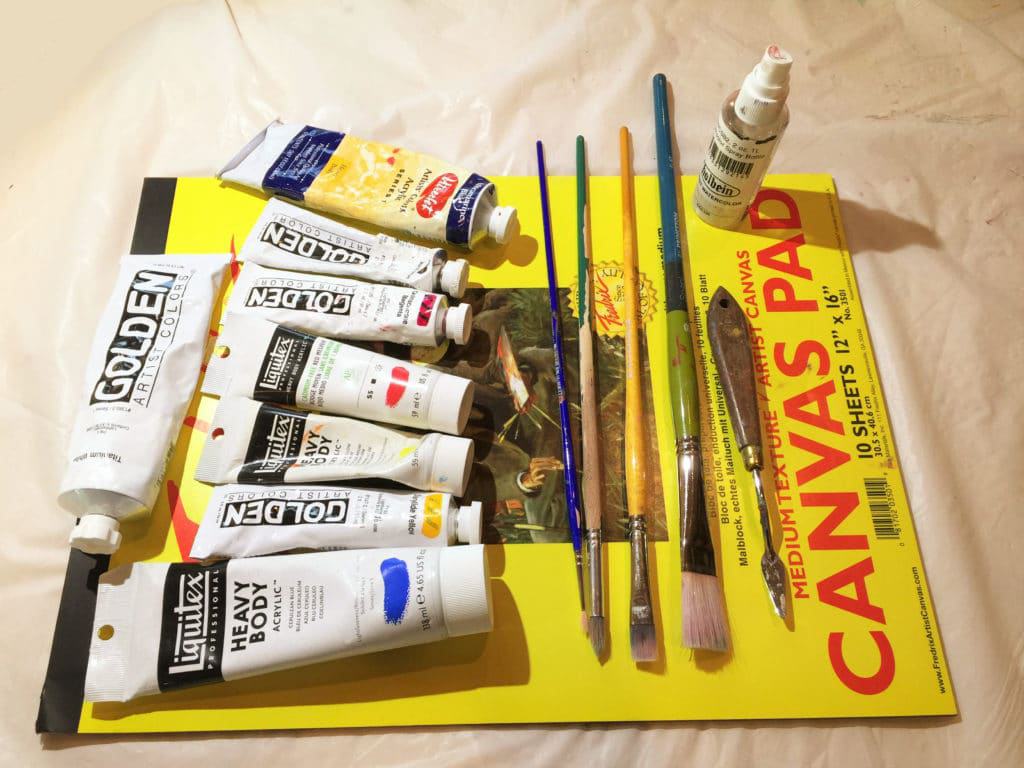
Supplies I Used:
Titanium White
Ultramarine blue
Cerulean blue
Cadmium yellow light
Diarilyde yellow (or another dark yellow)
Red cadmium light
Quinacridone magenta
Burnt umber
Water sprayer (to keep the paint moist)
Brushes (½”, and ¼”, and a small round)
8×10 canvas or canvas pad
Colored pencil
Palette knife (to mix the paint)
Step One
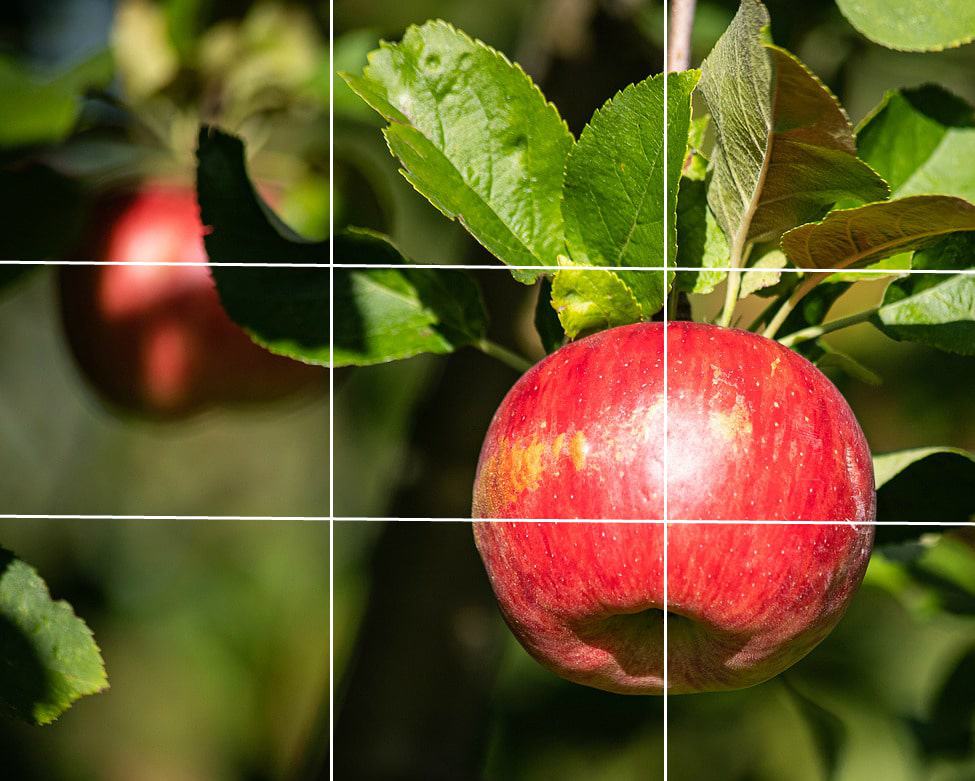
The photo.
I found a royalty-free reference photo that I wanted to use searching on Pixabay Creative Commons.
I cropped the image proportionally to the canvas size I wanted to use, 8”x10”.
I drew grid lines on the photo (I did it digitally on pixlr.com), but I could have printed it out and done it manually.
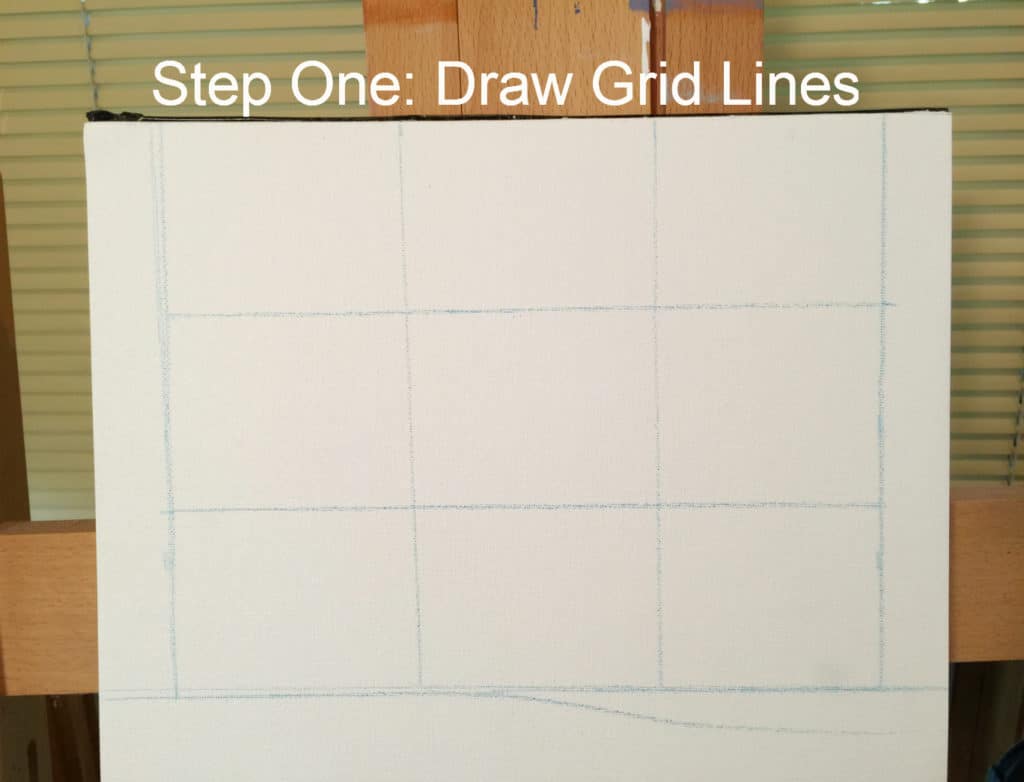
Step Two
Draw the grid.
I decided to paint on a sheet from my canvas pad. I drew an 8×10 inches rectangle on my sheet using a colored pencil – graphite pencils tend to smear and show through the final panting.
Tip: Make sure the grid lines on the canvas follow the same proportions as on the photo.
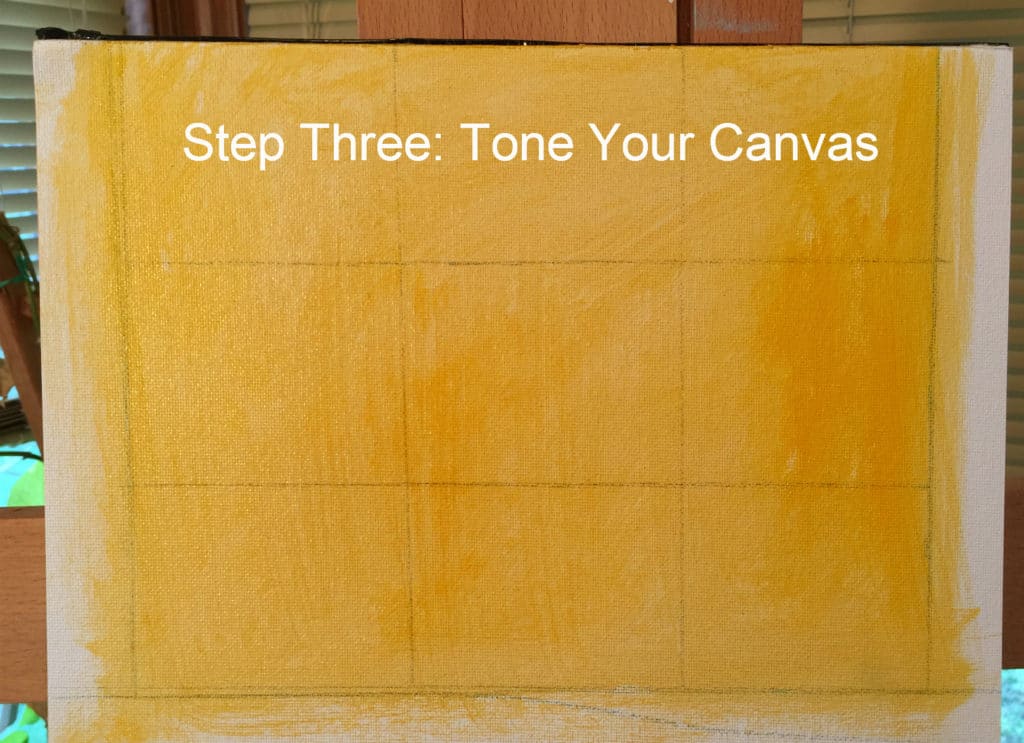
Step Three
Tone your canvas.
I toned with slightly diluted Diarilyde yellow. I love that it’s a semi-transparent color and it does not cover the colored pencil lines. If your color is opaque and ends up covering the lines, wait for the tone to be dry and re-draw them.
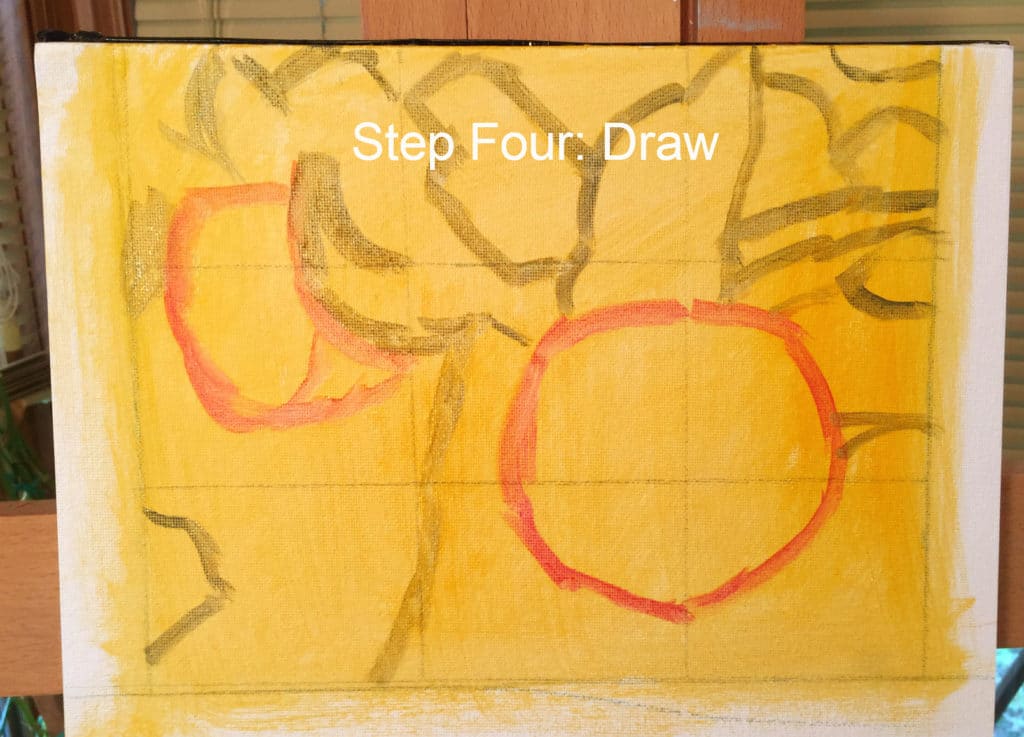
Step Four
Draw with thin paint.
Use your grid as a reference to place lines and shapes within each section.
The drawing does not have to be perfect, but the placement of shapes should be pretty close to the reference photo.
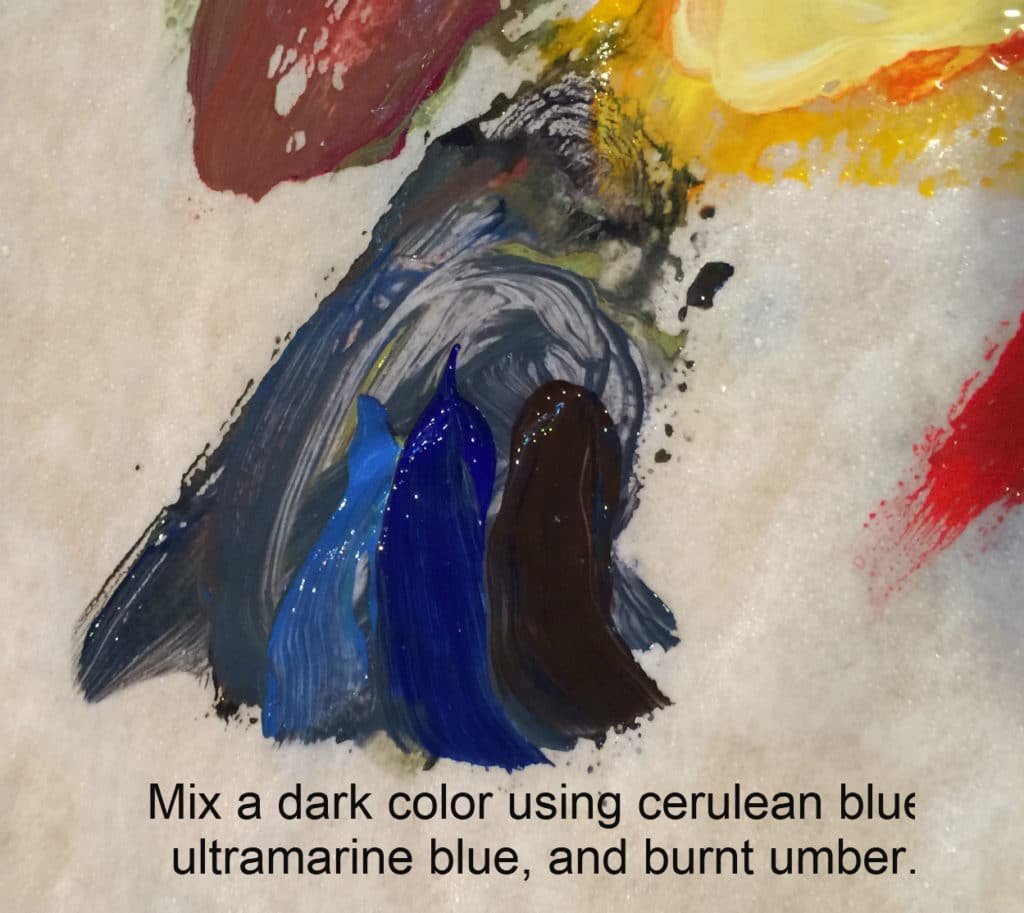
I drew the edges of apples with cad red light and the dark shapes on the foliage with a mixture of ultramarine, cerulean, and burnt umber.
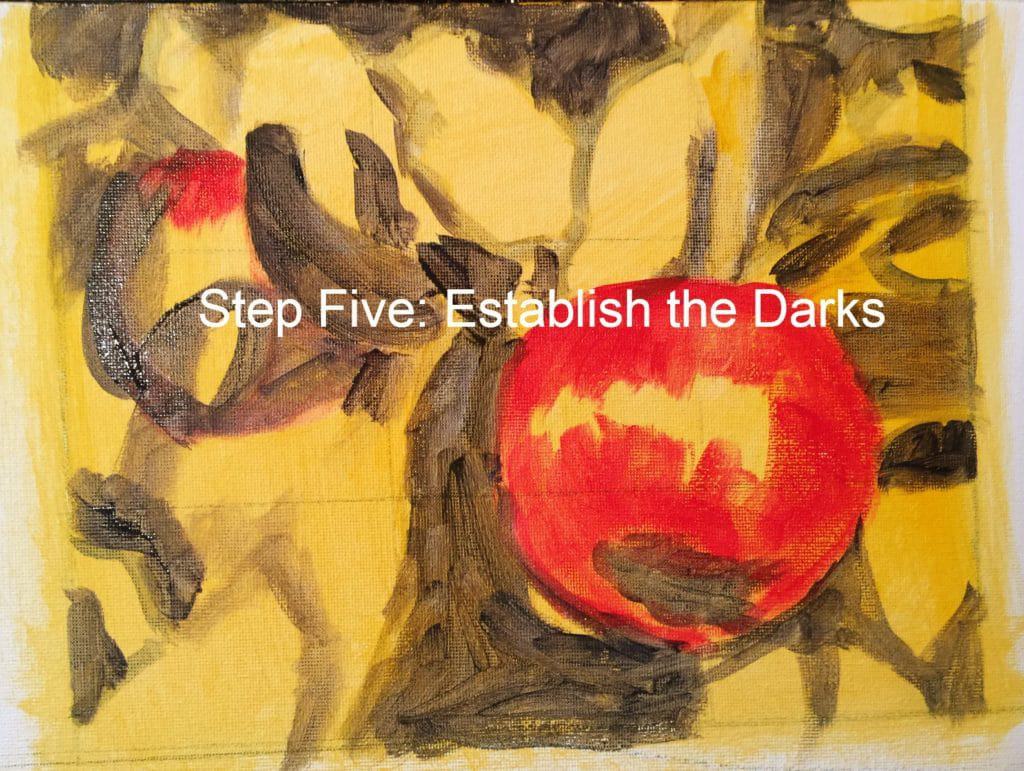
Step Five
Establish the darks.
Fill in the dark shapes use a dark mix of ultramarine, cerulean, and burnt umber.
For the apples, apply cad red light on the spots where you see bright red.
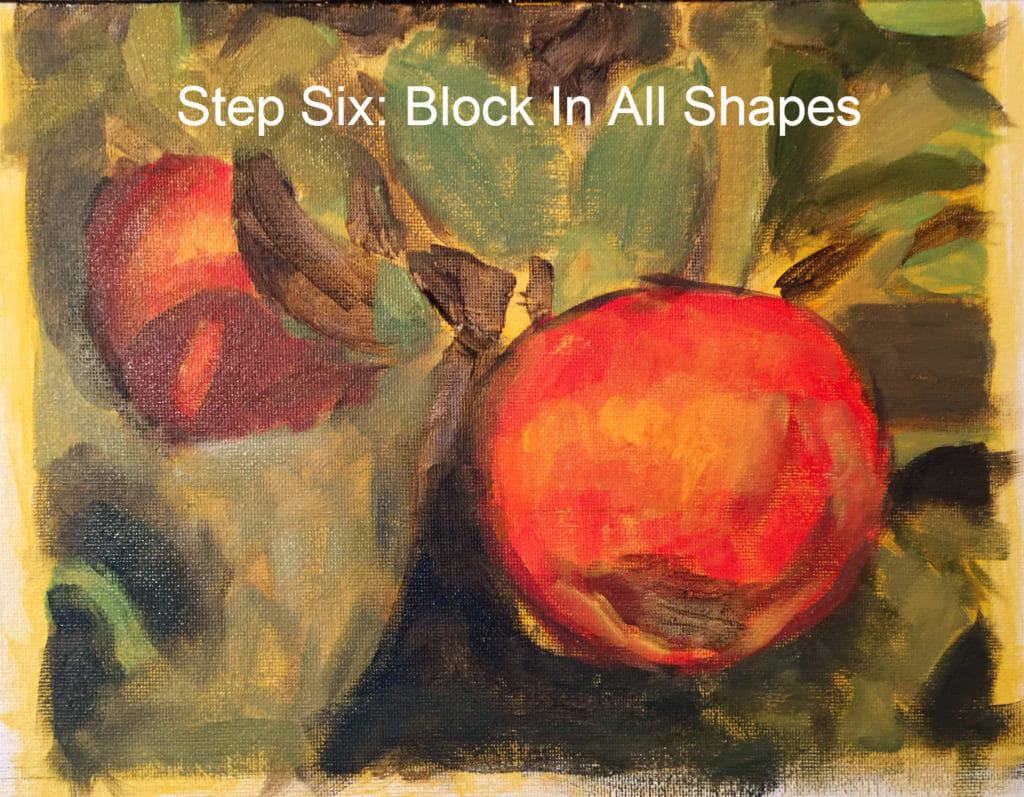
Step Six
Block in all shapes.
Fill in brighter leaves with a mix of cerulean blue and cad yellow light, and add some dark yellow and some ultramarine blue for the duller leaves Add some white to the different greens for the duller and lighter leaves.
Go over the dark shapes with another layer of the dark mixture to refine the shapes.
Paint the areas of strong light reflection with yellow. This will be a great base for the highlight at the end.
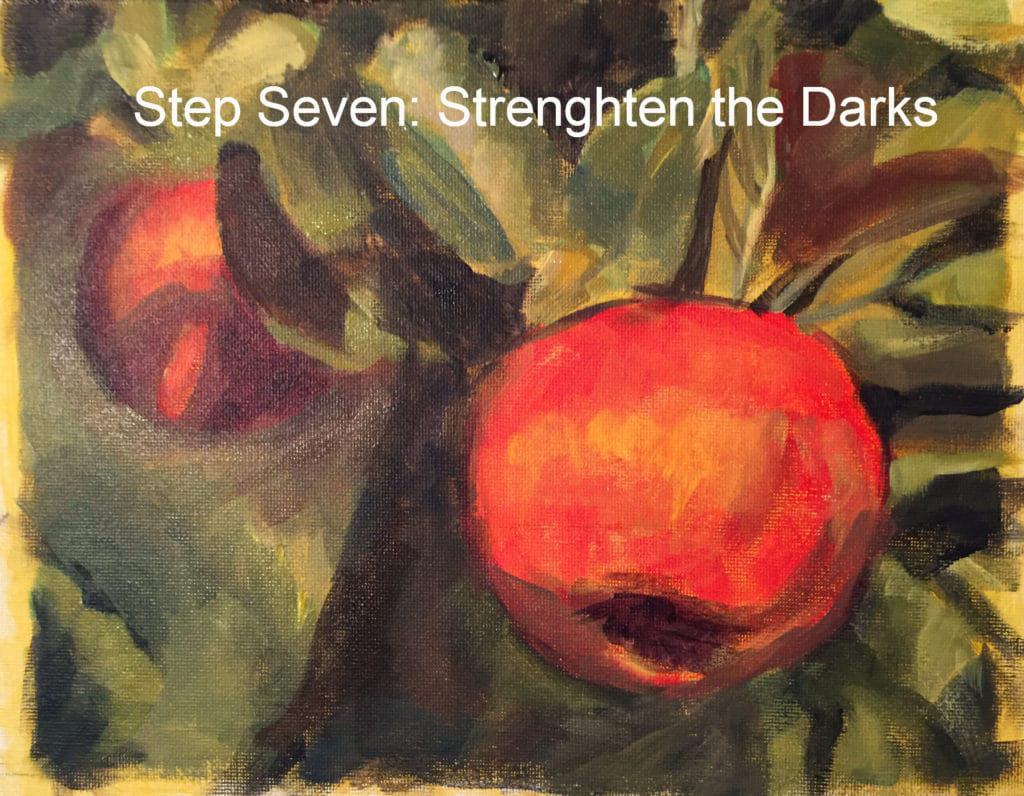
Step Seven
Strengthen the darkest darks.
Look at the dark areas and compare their relative darkness. Mix more of the dark color and go over the areas that need to be made darker. This is the perfect opportunity to refine your drawing and correct any shapes that look strange.
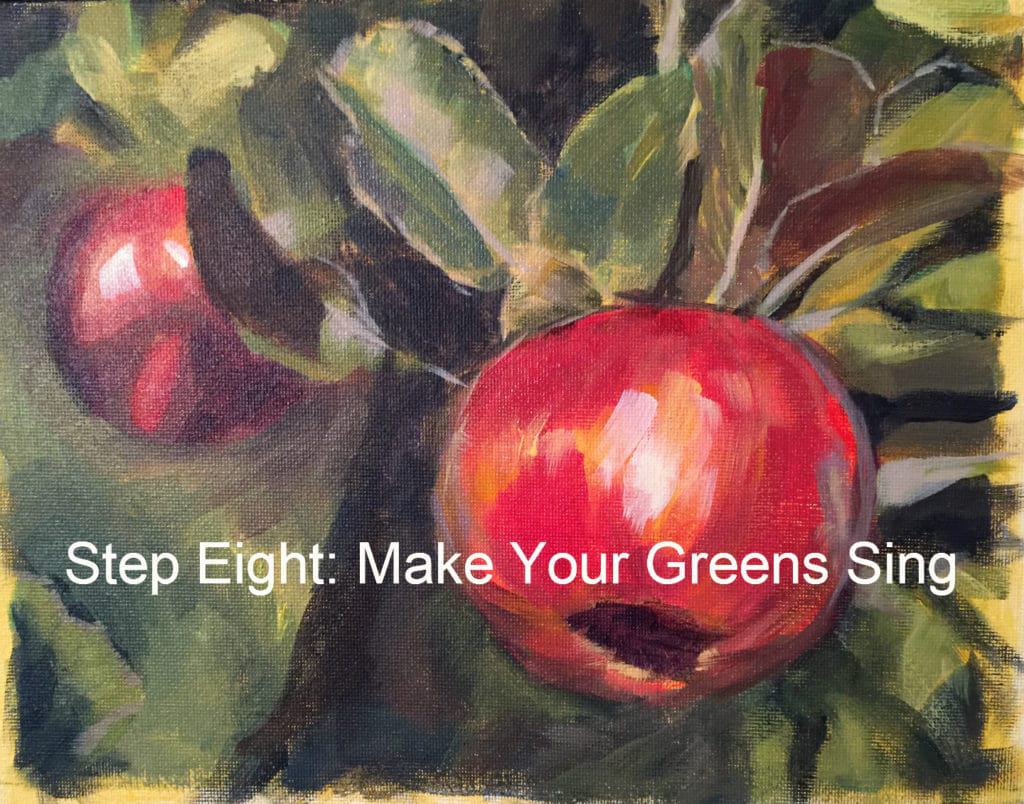
Step Eight
Make your greens sing.
Observe how some leaves are warmer, others are cooler, some are lighter, some are darker. At this stage, your goal is to match those variations. Pre-mix a few greens, some bright, some dull. Cerulean blue and cad yellow light make a bright green, ultramarine blue and a darker yellow make a duller green. Add white for lightness, add red to dull it down. Apply the brighter greens to the bright leaves that are more in focus. Use the duller colors for the out of focus areas and to make leaves recede. Look for opportunities to improve your drawing.
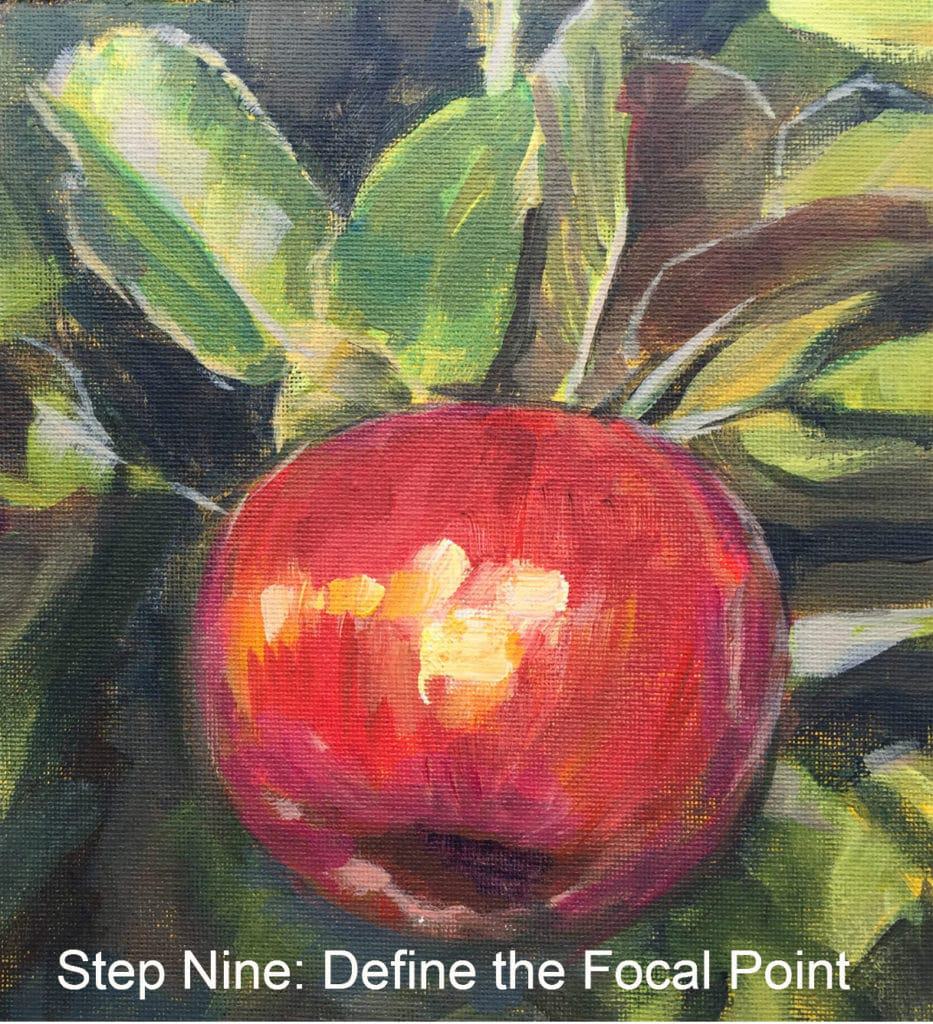
Step Nine
Define the focal point and add highlights.
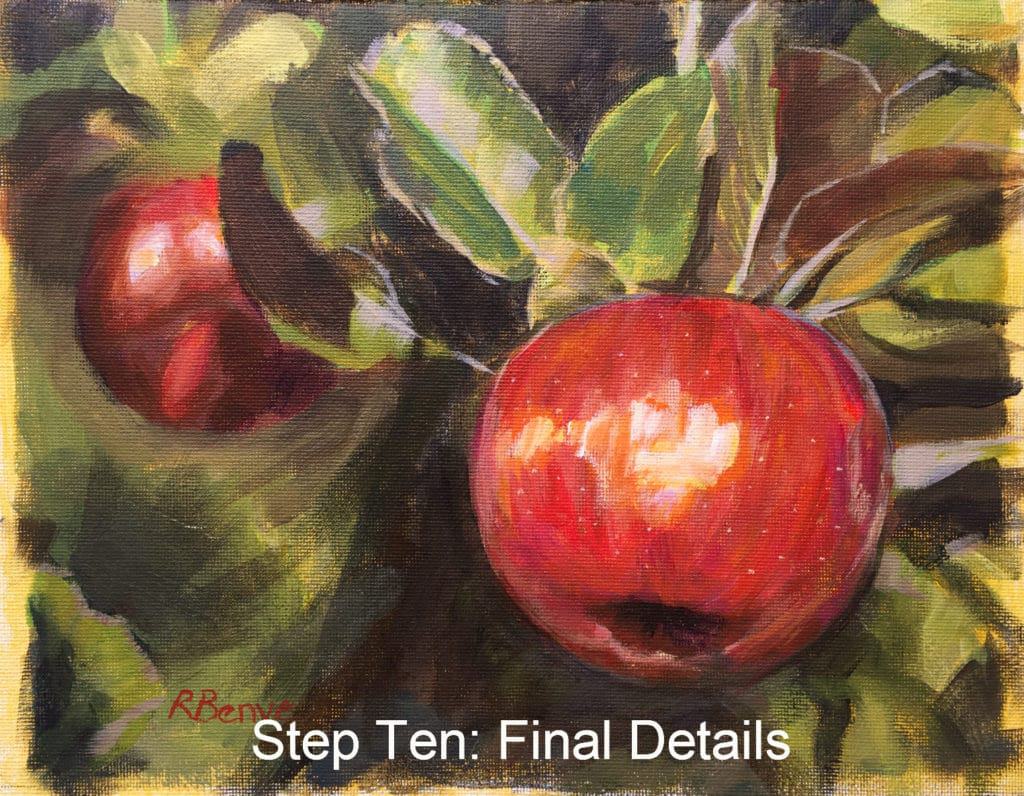
The star of this painting is the big apple, supported by the leaves on top of it.
Look at all the different variations of red-orange on the apple, and pay attention to the reflected light, especially on the edges. Try to create form and volume rendering subtle variations that you see on the different planes of the apple reflect light and affect the color.
Add highlights on the apple and define the edges of the leaves with a very light yellowish-green.
Step Ten
Final details.
Fine-tune the highlights and reflected light on the apple and create tiny light dots on the apple, randomly placed.
Take a few steps back from your painting, check for things that may not look right, paint a few brushstrokes with a clear intention to fix problems, step back again, repeat.
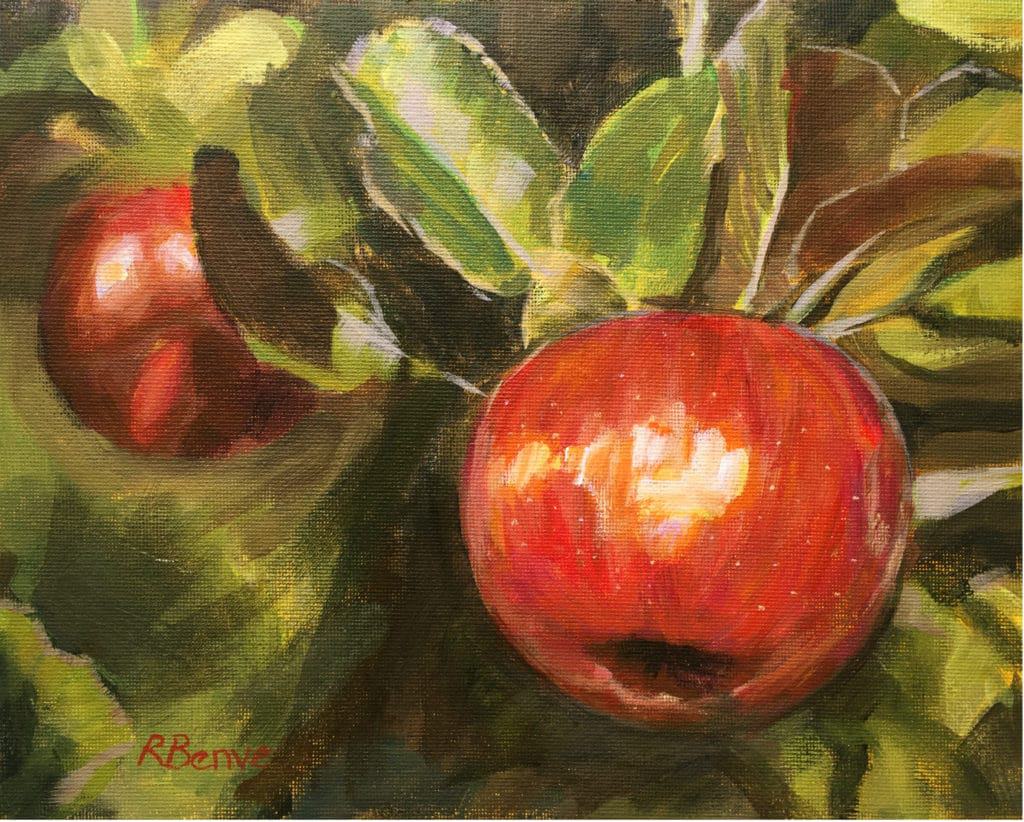
When you are happy with it, you can sign your masterpiece and proudly hang it on your wall.
Congratulations
How to Further Develop Your Acrylic Painting Skills
The best way to get better is to paint, paint, and paint.
Don’t be afraid of the dubious results, just enjoy the act of painting and embrace the thousands of tiny decisions and challenges that each piece brings.
Below is a list of successful practices that can help improve your painting skills.
8 Pro Tips for Developing Acrylic Painting Skills
- Use a grid to assist you with proportions. You can place or draw a grid over your reference photo and sketch a proportional grid onto your canvas. The idea is to try and match each respective portion of the grid on your reference to that of your painting.
- Take progressive photographs of your painting. This will not only give you an interesting record of your painting but will also provide valuable insights on where you may be able to improve your painting
- Look at the progress photos during the day when you are not painting to work out the next steps in your painting process.
- If you are stuck on a painting, start a new painting and come back to the one you are stuck on at a later time.
- Take a few steps back from your painting from time to time, view it from different angles, hang it in a different light.
- Look at your painting in a mirror. This will give you a completely different perspective and allow you to see issues that you may not pick up when looking straight to your painting.
- Pay a lot of attention to the relative value (how light or dark something is) of things. Making your reference photo black and white helps seeing values
- Compare, compare, compare.
Where can I learn acrylic painting?
Goldenpaints.com has a lot of informative resources on their website.
Here are links to a couple very informative articles for the beginner painter:
Guide to Choosing the Best Paint Brushes for Acrylics and Oils
6 Basic Acrylic Painting Techniques for Beginners
Here are some paid courses by Rod Moore, one of the biggest names in Acrylic Painting:
Thanks for Reading!
I love to share all the things I wish I knew about acrylics when I was a beginner. I learned them the hard way, with many trials and countless disappointing paintings. I hope this tutorial helps you with making your learning process easier and faster than mine.
Robie Benve is a self-taught professional artist who loves to share with others the things that she learns.
Born and raised in Italy, she holds an MBA from the University of Venice, Italy.
Robie is always looking for opportunities to learn more and get better at her craft. After she acquires a new concept or a skill, she enjoys sharing it with others, in the hope that it will help beginners.
She lives, paints, and writes in Columbus, Ohio.

Ik schilder al van mijn 7 jaar, ik ben er bijna 65 en heb heel wat schilderijen met inkt en acryl en pouring gedaan.
Ik heb een vraagje voor jou.
Ik zoek al jaren de pigmentdichtheid van acryl en krijg die niet te pakken.
Daar ik pour al volg seder Deby vraag ik u beleefd of je mij deze per mail zou willen bezorgen, ik zou u daar zeer dankbaar voor zijn.
Nog een prettige dag
Claire Vanfleteren België West-Vlaanderen
very nicley written. i have just started learning acrylic paintings. you have cleared some of my doubts. i got some new tips it will really helpfull. thank you so much for this information.